Documentation
Jan 6, 2026
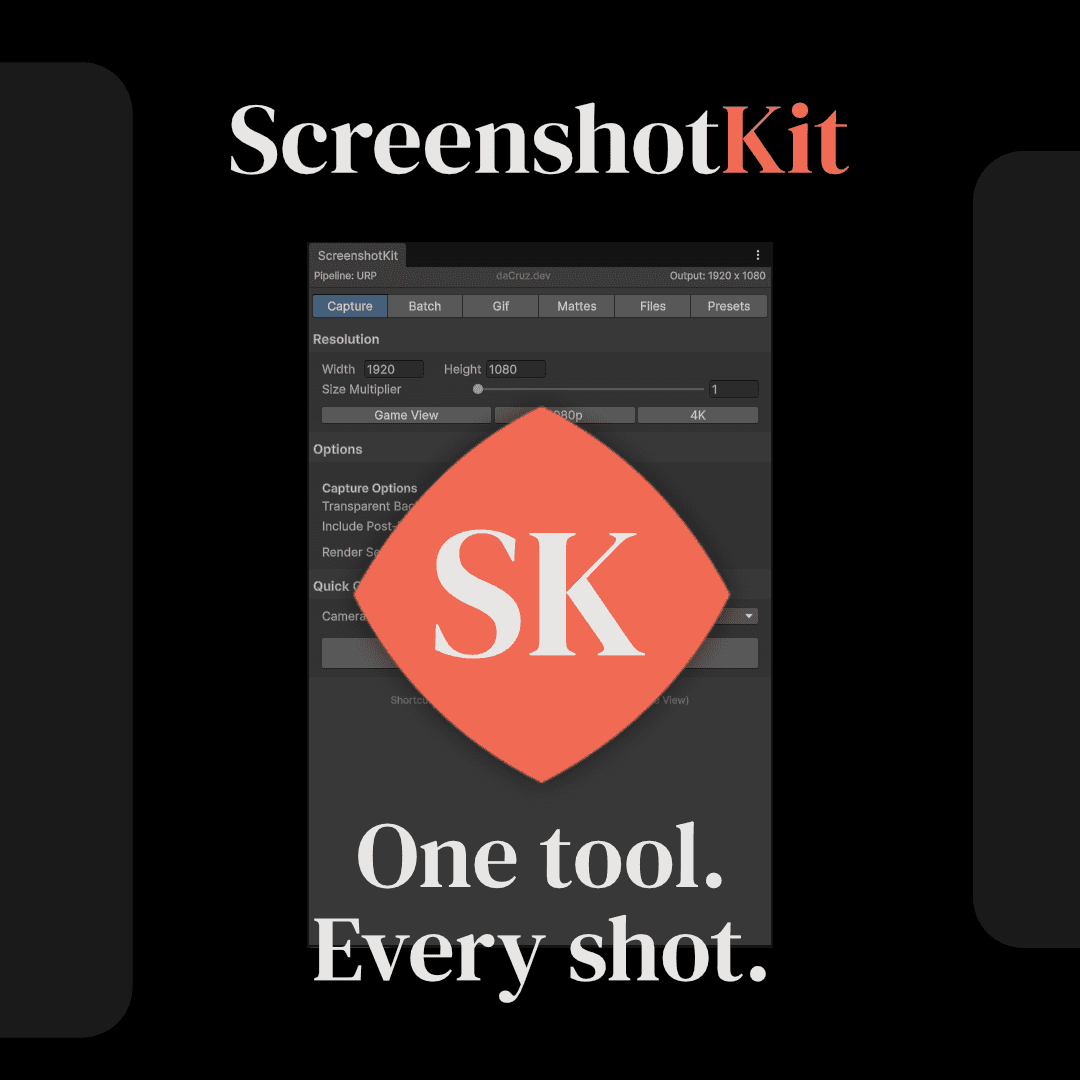
ScreenshotKit Documentation
Current Latest version 1.1.0
// === CHAPTER 1: GETTING STARTED ===
ScreenshotKit is a Unity Editor tool for capturing high-resolution screenshots, animated GIFs, image sequences, and compositing passes directly from the Editor. It works with URP, HDRP, and the Built-in render pipeline. No scripting required.
// --- Requirements ---
Unity 2021.1 or later. The tool detects your active render pipeline automatically and adjusts its behaviour to match. You will see the detected pipeline displayed in the header bar of the main window.
// --- Installation ---
Import the ScreenshotKit package from the Unity Asset Store through the Package Manager. Once imported, the tool is ready to use immediately. There is no manual setup, no assembly definition to configure, and no dependencies to install.
If you move the package folder after import, the tool will relocate its settings ScriptableObject alongside itself. You can place it in Assets/Plugins/ScreenshotKit, Assets/Tools/ScreenshotKit, or wherever suits your project structure.
// --- Opening the Window ---
Open the main interface from the Unity menu bar:
Tools > ScreenshotKit > Settings Window
The window docks like any other Editor panel. Its minimum size is 440 x 520 pixels, which makes it comfortable as a side panel next to the Scene View. The header bar at the top always shows two things: the active render pipeline and the current effective output resolution.
// --- The Scene View Overlay ---
A compact overlay sits in the Scene View toolbar, giving you four quick-access buttons without needing the full window open:
Quick Capture takes a screenshot of the currently selected camera using whatever settings are active. Scene View Capture grabs exactly what the Scene View is showing. Focus Camera snaps the Scene View to match the selected camera's position and rotation, so you can frame your shot before capturing. Settings (the gear icon) opens a dropdown with the most common toggles: resolution presets, transparent background, open-folder-after-capture, and a shortcut to the full settings window.
// --- Your First Screenshot ---
Select a camera in your scene. Click Quick Capture in the Scene View overlay. Done. The screenshot saves to the Screenshots folder inside the ScreenshotKit package directory, and if "Open Folder After Capture" is enabled in settings, Finder or Explorer will pop open to show you the file.
If you want to change the resolution, file format, or any capture options before shooting, open the full settings window first. Everything is in the Capture tab.
// === CHAPTER 2: CAPTURE ===
The Capture tab is the primary workspace. Single-shot screenshots, Scene View captures, batch multi-camera captures, and a live thumbnail grid of recent outputs all live here.
// --- Resolution ---
Set a base Width and Height in pixels. Three quick-set buttons jump to common sizes: Game View (reads the current Game View resolution automatically), 1080p (1920 x 1080), and 4K (3840 x 2160).
The Size Multiplier is where things get interesting. It scales the base resolution before capture, so a multiplier of 2 on a 1080p base produces a 3840 x 2160 image. A multiplier of 4 gives you 7680 x 4320. The header bar updates in real time to show the effective output dimensions as you adjust the slider.
// _ Formula: effectiveWidth = width * sizeMultiplier, effectiveHeight = height * sizeMultiplier _
// --- Resolution Presets ---
Below the resolution fields is a preset list. You can save your own frequently used resolutions here. Use Current pre-fills the new preset fields with whatever resolution is active, and + Add saves it to the list. Presets persist in the ScreenshotSettings ScriptableObject alongside everything else, so they survive between sessions and are shared across your team if the settings file is committed to version control.
// --- Capture Options ---
Transparent Background cuts out the camera background entirely, producing a PNG with an alpha channel. For this to work, the camera's Clear Flags need to be set to Solid Colour with the background alpha at 0. The tool will display a HelpBox warning if the setup is wrong.
Include Post-Processing controls whether bloom, colour grading, depth of field, and other post-processing effects are baked into the output. Turn it off for a clean, unprocessed render.
There is a catch with these two options: URP's final post-process pass stamps alpha to 1 across the entire frame, which destroys transparency. So the tool historically treated them as mutually exclusive. That changed with the new post-process transparent composite capture (covered below).
Post-Process + Transparent is a new capture mode that sidesteps the URP alpha problem. When both Transparent Background and Include Post-Processing are enabled, the tool runs a multi-pass pipeline internally:
A beauty pass with full post-processing on a black background (correct RGB).
Optionally a second beauty pass on a white background.
A Cryptomatte Alpha pass via replacement shader (correct alpha mask).
It then composites the results into a single RGBA image on the CPU. The Alpha Source dropdown gives you control over how the alpha channel is derived:
Cryptomatte Alpha uses the replacement shader pass only. Cleanest result, works on geometry that the Cryptomatte system can see.
Post-Process Alpha derives alpha mathematically from the difference between the on-black and on-white renders. Picks up everything post-processing touches, including particles and transparent effects, but can produce slight noise in edge cases.
Hybrid (default) takes the maximum alpha from both methods per pixel, giving you the best coverage.
A small threshold clamp kills the tonemapping noise that would otherwise leave 1-3 values of alpha in empty background areas.
Render Selected Mattes is a convenience toggle that automatically runs all enabled matte passes from the Mattes tab alongside your main screenshot. When this is on, the Quick Capture button and the batch capture both output matte files in addition to the beauty pass.
Layer Mask lets you choose which Unity layers are included in the capture. It defaults to Everything. Under the hood, the tool temporarily overrides camera.cullingMask during the capture and restores it in a finally block, so nothing gets left in a broken state even if the capture throws an exception.
// --- Capture Actions ---
Quick Capture takes a single screenshot from the selected camera. If Render Selected Mattes is enabled, the notification will report how many matte files were generated alongside the beauty pass.
Scene View Capture grabs whatever the Scene View is currently showing, at its current resolution (not affected by the Width/Height fields).
Batch Capture renders a screenshot from every camera in the scene. You can assign specific cameras to a batch list in the Batch Cameras section. If Render Selected Mattes is on, the button label changes to "Capture All + Mattes" and the summary dialog at the end reports the total number of matte files written.
Snap to Scene View captures the Scene View and saves it as a file, distinct from Scene View Capture in that it uses the resolution and format settings from the Capture tab rather than the Scene View's native resolution.
// --- File Format ---
Choose between PNG, JPG, and EXR.
PNG is the default and supports transparency. JPG is smaller but lossy and has no alpha channel. EXR is the big one for professional pipelines.
When EXR is selected, two extra settings appear: Compression (None, Zip, or RLE) and Output as Float (full 32-bit float vs. 16-bit half-float). Half-float is usually sufficient and produces files roughly half the size. EXR captures use a linear ARGBFloat RenderTexture and RGBAFloat texture format, so no tonemapping bake is applied. This matters enormously if you plan to composite in Nuke, DaVinci, or After Effects.
// _ EXR thumbnails in the recent screenshots grid show a grey placeholder, because Unity's LoadImage cannot decode EXR at editor time. The files themselves are fine. _
// --- Recent Screenshots ---
The bottom of the Capture tab shows a thumbnail grid of your most recent outputs: 4 rows of 6 (24 images). The grid is dynamic and will auto-generate rows based on how many files exist. Transparent PNGs display over a checkerboard background so you can distinguish transparency from black, the same way Photoshop does it.
Click any thumbnail to open it in your OS image viewer. Right-click to reveal it in Finder/Explorer.
// === CHAPTER 3: GIF AND IMAGE SEQUENCES ===
The second tab handles animated recording: both GIF export and frame-by-frame image sequence capture. Both modes require Play Mode, since they record from the live game camera.
// --- Recording Settings ---
These settings are shared between GIF and Sequence recording.
Frame Rate offers presets (10, 15, 24, 30, 60 fps) and a Custom option that unlocks a slider from 1 to 244 fps.
Resolution is a scale factor applied to the camera's output. For GIFs, the output is also capped at 1024 pixels on the longest edge (GIF is not a format that benefits from large resolutions). For image sequences, this scale applies with no cap.
Max Duration sets the maximum recording time in seconds, from 1 to 60. Recording stops automatically when this limit is reached. You can always stop manually before the limit.
// --- GIF Recording ---
Click Record GIF to begin. If you are not already in Play Mode, the tool enters Play Mode for you automatically. A red "Recording..." indicator appears in the window while capture is active. When you stop (or the max duration is reached), the frames are encoded into an animated GIF and saved to the GIFs output folder.
Loop controls whether the GIF loops or plays once. Compression adjusts the quality/size trade-off.
// --- Image Sequence Recording ---
Click Record Sequence to capture individual frames to disk instead of encoding a GIF. Each frame writes directly as a separate image file (PNG, JPG, or EXR, matching whatever format is selected in the Capture tab). There is no resolution cap and no encoding overhead, so this is the path to use when you need full-quality output for compositing.
Frames are saved to a per-camera folder named ImageSequence_<CameraName> inside the Sequences output directory. Filenames use zero-padded frame numbers.
// --- Sequence Options ---
The Sequence Options foldout exposes two toggles specific to image sequence recording:
Transparent Background renders each frame with transparency, independent of the Capture tab's transparent toggle. This lets you keep different settings for stills vs. sequences without constantly switching back and forth.
Render Cryptomattes per Frame runs all enabled matte passes on every single frame of the sequence. Matte outputs go into per-pass subfolders inside the sequence folder (e.g. ImageSequence_MainCamera/ObjectID/, ImageSequence_MainCamera/DepthLinear/). This is where the tool starts to feel like a lightweight render farm: you get a beauty sequence plus decomposed passes, ready to load into a compositing app as separate layers.
// --- Camera Selection ---
The GIF/Sequence Camera section lets you pick which camera to record from. By default it uses the main camera, but you can assign any camera in the scene.
// --- Recent Recordings ---
A separate thumbnail section at the bottom of the tab shows recent GIFs and sequence folders. Sequence entries display a matte pass count if Cryptomatte subfolders exist inside the sequence directory.
// === CHAPTER 4: MATTES AND CRYPTOMATTES ===
This is the compositing toolkit. The Mattes tab gives you access to a library of render passes that break your scene down into isolated components: object IDs, material IDs, depth maps, normals, lighting channels, and more. Each pass renders through replacement shaders or custom HLSL and outputs a separate image file alongside your beauty capture.
// --- What Are Mattes? ---
In film and VFX compositing, a "matte" is a greyscale or colour-coded image that isolates a specific aspect of the scene. A depth matte tells the compositor how far each pixel is from the camera. An object ID matte assigns a unique flat colour to each mesh, so you can select and adjust individual objects in post. ScreenshotKit generates these passes by temporarily swapping materials on your scene objects and rendering through specialised shaders, then restoring everything afterwards.
The term "Cryptomatte" comes from a VFX industry standard originally developed at Psyop. ScreenshotKit uses the concept loosely to refer to its full set of ID-based and data-based passes.
// --- Pass Categories ---
The Mattes window organises its passes into named categories with descriptive tooltips on every option.
Segmentators are ID passes that assign a distinct colour to scene elements based on different criteria:
Object ID assigns a colour per mesh/renderer. Each object in the scene gets its own flat colour, making it trivial to isolate in Photoshop or Nuke.
Material ID assigns a colour per material. Objects sharing the same material share a colour.
Layer Cryptomatte assigns a colour per Unity layer. If you have organised your scene into layers (Environment, Characters, Props, etc.), this pass reflects that grouping directly.
Shader ID assigns a colour per shader type.
Camera-Based passes use camera data rather than replacement shaders:
Depth (Linear) outputs a linear depth buffer, white at the camera and fading to black at the far plane.
Depth (Raw) outputs the raw depth buffer value without linearisation.
Alpha generates a clean alpha mask of scene geometry via replacement shader. This is the same pass used internally by the post-process transparent composite.
Lightmap captures baked lightmap data. The tool uses a dedicated
Hidden/ScreenshotKit/LightmapUnlitshader that correctly samples UV1 (the lightmap UV set) and applies lightmapScaleOffset as a Vector4 property. An earlier version had a bug where it sampled UV0 instead, causing offset results. That is fixed.
Render Buffers decompose the lighting model into individual contributions:
Diffuse shows only the diffuse lighting component.
Specular isolates specular highlights.
Reflection captures reflection probes and SSR contributions.
Refraction isolates refracted light.
Emission shows only emissive surfaces.
Shadow outputs shadow attenuation.
Ambient Occlusion isolates AO.
Debug Buffers are technical passes useful for shader debugging and pipeline inspection:
Normals outputs world-space normal vectors as RGB.
Motion Vectors shows per-pixel motion, useful for verifying motion blur setups.
World Position outputs world-space position as RGB.
Stencil Buffer visualises stencil values.
// --- Using Mattes ---
Enable the passes you want by toggling them on in the Mattes tab. Then either:
Turn on Render Selected Mattes in the Capture tab's options, and every Quick Capture or Batch Capture will automatically generate the matte files alongside the beauty pass.
Or click the dedicated Render Mattes button at the bottom of the Mattes tab to run the selected passes independently.
Matte files save into the same output folder as your screenshots, with a suffix identifying the pass (e.g. MainCamera_1920x1080_ObjectID.png).
For image sequences, enabling "Render Cryptomattes per Frame" in the Sequence Options foldout will generate the full set of matte passes on every frame, organised into subfolders.
// --- Compositing Workflow ---
A typical compositing workflow looks like this: capture your beauty pass as an EXR for maximum dynamic range. Enable Object ID, Depth Linear, and Normals. Import everything into Nuke, DaVinci, or After Effects. Use the Object ID pass to create selections. Use the depth pass for depth-of-field or fog in post. Use normals for relighting.
If you need transparency with post-processing, use the composite capture mode from Chapter 2 instead of the raw Transparent Background toggle. The Alpha matte pass is what makes that pipeline work.
// === CHAPTER 5: SETTINGS ===
The Settings tab (and the gear dropdown in the Scene View overlay) controls output paths, keyboard shortcuts, and global behaviour.
// --- Output Folders ---
ScreenshotKit maintains three separate output directories: one for screenshots, one for GIFs, and one for image sequences. By default these are named Screenshots, GIFs, and Sequences and sit inside the ScreenshotKit package folder. You can rename the folder names in the Settings tab if you prefer something different, but the location always stays relative to the package root.
Open Folder After Capture does exactly what it says. When enabled, Finder or Explorer opens to the output file after every capture.
// --- Keyboard Shortcuts ---
Two shortcuts are configurable: one for Quick Capture and one for Scene View Capture. Each is built from an optional combination of Ctrl, Shift, and Alt modifiers plus a key from a full KeyCode dropdown. The current shortcut string is displayed as a label above the configuration row so you can see at a glance what is assigned.
Both shortcuts respond only when a Scene View window has keyboard focus. A HelpBox reminds you of this constraint.
To disable a shortcut, set the key to None.
// --- Pipeline Notes ---
ScreenshotKit detects the active render pipeline at startup and displays it in the header bar. Some combinations of features have pipeline-specific limitations:
In URP, the post-process stack writes alpha = 1 to the frame buffer, which is why the composite capture exists as a workaround. The tool shows a HelpBox when you enable a combination that will not work as expected on your current pipeline.
In HDRP, post-processing behaviour around alpha is different and generally more cooperative, but the composite path still works as a fallback.
The Built-in pipeline has the fewest restrictions, since post-processing in the Built-in pipeline does not touch alpha the same way.
// --- Filename Generation ---
Output filenames follow the pattern:
CameraName_WidthxHeight.extension
When matte passes are included, the pass name is appended:
CameraName_WidthxHeight_ObjectID.png
For image sequences, the frame number is zero-padded and appended:
CameraName_0001.png, CameraName_0002.png, etc.
Sequence matte passes go into subfolders named after the pass: ImageSequence_MainCamera/ObjectID/MainCamera_0001.png.
// --- Settings Storage ---
All settings are stored in a single ScreenshotSettings ScriptableObject that lives next to the ScreenshotKit package files. This includes resolution, format, capture options, matte toggles, GIF settings, sequence settings, keyboard shortcuts, and resolution presets.
Because it is a ScriptableObject, you can commit it to version control. The entire team gets the same capture settings, the same presets, and the same keyboard shortcuts. If you want per-user overrides, add the file to your .gitignore and let each developer configure their own.
Changes are saved via Unity's SerializedProperty system with full undo support. Every slider drag, every toggle, every dropdown change is undoable with Ctrl+Z.